KataGo Opening Books - 7x7 Highlights and Discoveries
Here we give an overview of some of the most fascinating and fun variations and discoveries from KataGo's 7x7 books, relative to earlier attempts at solving 7x7. See the top of the main page for links to the book and downloads.Contents
- Overview and Prior Work
- Optimal Komi in Japanese Rules is Probably 8, Not 9!
- Almost Discovered Earlier by MMCTS
- Deep Seki Rules Differences
- White Post-Dame-Ko Flips Japanese and Chinese Advantage
- A Slide Refutes a Slide
- New Seemingly Optimal Opening Moves
- Other Highlights
Overview and Prior Work
Although not exhaustive, some of the notable prior published attempts to analyze or solve 7x7 appear to include:
- An American Go Journal article by James Davies with additional SGF here summarizing work by various pros and amateurs from the 1970s and 1980s.
- An academic paper Towards a solution of 7x7 Go with meta-MCTS by Chou et al. published in 2011 that applied computer techniques and discovered some new overlooked lines.
- An excellent article in Chinese published by a Chinese pro Li Zhe 6p around 2015 in collaboration with other pros, with some of the best overall summary of analysis up to that point in time.
- A later 2020 blog post by another individual in Chinese in response to the prior article, that applies some computer analysis and points out some minor improvements to the conclusions of that article, with a much broader analysis of a few variations.
- (Edit: 2021-08-07) - A smaller Chinese rules 7x7 book from Crazystone also from late 2020, which, although we were not aware it of prior to publishing the first version of our book, also independently discovers and confirms many of the same lines, including the most important new line for White under Japanese rules!
Much thanks and respect to the authors of these prior works! They were all fun and instructive to read, and they were hugely helpful to provide context for interpreting the results of KataGo's analysis, as well as for finding some of the most interesting variations to analyze and explore deeper. Our ability to comment on and understand the key moves owes much to the foundation provided by these past efforts.
Relative to some of these earlier 7x7 solution attempts, KataGo's opening books on this site do appear to include some new moves and discoveries! As of late 2021, we summarize some of the major highlights below.
Optimal Komi in Japanese Rules is Probably 8, Not 9!
This was actually discovered earlier in 2020 with KataGo's help, before these books, and many people contributed additional commentary and analysis at the time (for example this excellent video in Chinese and its followup), but is still worth re-emphasizing here. Prior analysis and solution attempts in the last several decades have all missed what seems to be a key tesuji for White, so for a long time the consensus of many solutions was that optimal play under Japanese rules gives B+9, but current analysis suggests it should be B+8.
The key new tesuji is White's probing cut at 12 here.
The meaning of this cut is that if Black simply captures it, then we get this. Now White 8 here is sente, because W threatens a big followup squeeze at A.
Namely, a squeeze like this.
Without the initial probe cut at D5, White would not be able to play at E6. We would get this instead, and Black would simply swallow the stone.
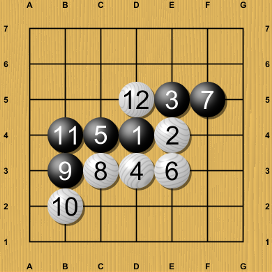
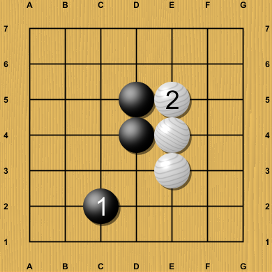
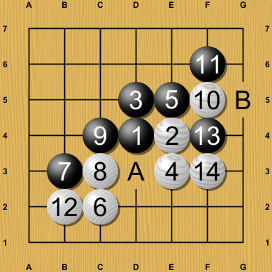
Going back, Black's main option to resist White's probing cut is to escalate the fight by playing at 1. White extends at 2, and then Black 3 and White 4 might follow next. There are other moves and orderings of those moves to consider for both players as well, with multiple optimal lines.
Most lines lead to extremely complex fights, with complicated races, tricky corner tesuji and ko fights behind each move that are necessary to analyze to verify that neither player can do better. The final result appears to be B+8 in Japanese rules and B+9 in area scoring rules, a superior result under Japanese rules and an equal result under Chinese rules compared to other openings.
All of the above is what enables White's opening choice to connect here, a move that was rejected by most past analyses. Now with White's new probing cut tesuji, connecting here appears to be one of the best possible moves, making B+8 the likely-optimal result under Japanese rules instead of B+9.
Almost Discovered Earlier by MMCTS
Fascinatingly, the authors Chou et al. of the Meta-MCTS paper *almost* discovered that optimal result in Japanese rules should likely be B+8, way back in 2011 before anyone else!
Many past analyses, while on paper supposedly only considering Chinese rules (or the New Zealand rules, or other area-scoring rules), still also tracked whether Black or White would make the last move, allowing them to simultaneously analyze the Japanese rules at the same time. This is because who makes the last move is by far the most common factor in why the score may differ between Chinese rules and Japanese rules: if Black makes the last move, Black gets one more point in Chinese rules since the stone itself counts for a point. This concept is also leveraged in Button Go, which achieves all the elegance of Chinese rules, while having the fine scoring precision and accuracy of Japanese rules and allowing for fairer games.
(As an aside, if Button Go were more popular, it might be a way to unify Chinese and Japanese rules, as it has some of the biggest advantages of both.)
Anyways, this otherwise minor last-move difference matters, since it is only under the Japanese rules's additional scoring precision that the White's new line becomes clearly superior rather than being equal.
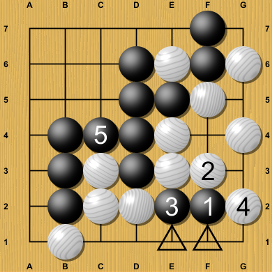
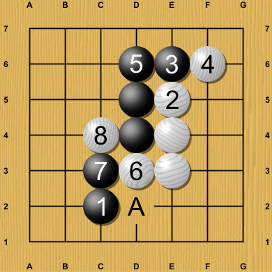
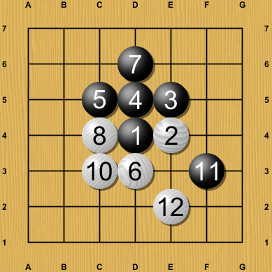
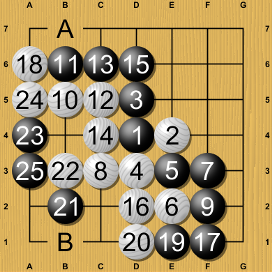
Unfortunately, the Meta-MCTS analysis of 7x7 was one of the few past attempts that *didn't* also track who would play last and thereby likely win under Japanese rules. Or if they or the professionals they worked with did track it, they unfortunately didn't publish it. Additionally, while their MMCTS algorithm discovered the critical lines, it failed to play them perfectly, so the authors appear to jump to some conclusions about some lines, which may have confused the analysis. For example, they give a failure diagram for Black claiming that Black's move 5 is bad:
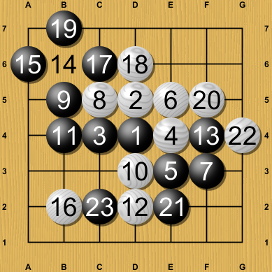
But at least, if KataGo is to be trusted, Black in fact still has multiple opportunities to win outright, including move 11 at B3 or move 23 at D1.
Perhaps seeing the possibility and frequency of such errors in their own internal development and testing made the authors rightfully cautious about drawing any conclusions or trying to synthesize an overall result. Nonetheless, their work did an amazing job of finding the right moves, well before anyone else!
It seems that outside of the specific pros asked to help consult for it, this paper may have been relatively unknown in the Go community, so later attempts at solving 7x7, such as the one spearheaded by Li Zhe many years later in 2015, might have been unaware of the moves diagrammed in this paper. Amusingly, this would mean that for many years, all the knowledge to suspect that B+8 was optimal was just publicly sitting in the open, with nobody having the fortune to realize and assemble the pieces!
Of course, even with our new analysis, we still can't be rigorously sure that Japanese B+8 is optimal. Maybe even KataGo now is still missing something. Could 7x7 have any secrets left?
Deep Seki Rules Differences
There are of course cases where Japanese and Chinese rules differ beyond just who moves last. One difference is that eye points are not counted in seki in Japanese rules. Although this mattering is very rare, among the critical bundle of variations leading to Japanese B+8, KataGo's new analysis in the above books has discovered one line where it matters! KataGo actually has some value blindness around this variation in live-analysis, but like several other errors in KataGo's real-time judgment, this was caught and corrected by the algorithm for expanding the book.
In this position in Japanese rules, either of A or B should be equally optimal, but in Chinese rules Black cannot play A.
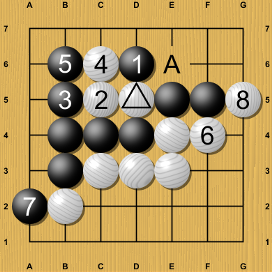
If Black does, one possible sequence is this. White might normally play 4 at A, but instead White carefully grips the Black stone.
The capturing race on the top is lost for White. Best case, it leads to a ko that White cannot win. But White has a plan.
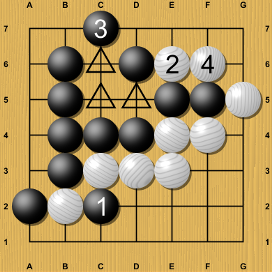
After a few more moves, Black is in a tough spot. Black can kill White at A, but then White blocks at B and will have too many points on the bottom, despite dying on the top. So Black must push at B...
And White ignores the push and turns the entire left side into seki! White will also be able to throw-in within the A2-A5 space and then win a ko inside that space as well, carving out some of Black's share of the seki. Then, this will be a seki in which White has two eyes while Black has none, with a final result of B+7. At fair komi, this is a win for White.
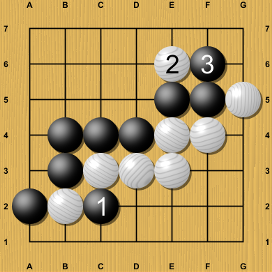
Under Japanese rules however, because White's eyes in the seki will not count as points, instead of White winning, this line is instead equally optimal to other lines, resulting in B+8, a draw at fair komi.
It is certainly interesting to find cases where such differences in the rules matter!
White Post-Dame-Ko Flips Japanese and Chinese Advantage
One other interesting way the Chinese rules and Japanese rules may differ is if one side can manage to delay the winning of a ko until after all dame are filled, to gain additional useful moves even beyond playing last, and thereby in Chinese rules gaining extra points relative to Japanese rules. This comes up in the following remarkable position from Li Zhe's article, and is a testament to the difficulty and subtlety of optimal endgame.
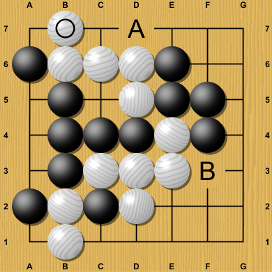
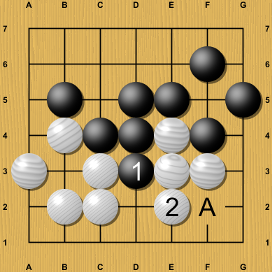
In this position, White is alive but owes exactly two moves inside (*in addition* to C1), regardless of whether Black plays A or B. Under Japanese rules, therefore both A and B are equally optimal, both leading to B+6. However, under Chinese rules, it is critical that Black play A first, probing inside.
Like this, White now owes 2 moves inside with nothing special going on, and with Chinese rules the game will end with B+7, and Japanese rules B+6.
But if Black simply connects, KataGo suggests a new move for White, to connect in reply here.
Next, White stakes their entire corner life and death on a ko. White still owes two moves inside so seemingly nothing has been gained. However, the key is that it's via a ko that they owe these two moves.
Black has no ko threats, nor does Black have any ability to force the ko to start without also reducing the number of moves White owes to 1, at least while there are still dame liberties.
So Black might as well just fill dame, and White happily fills dame too.
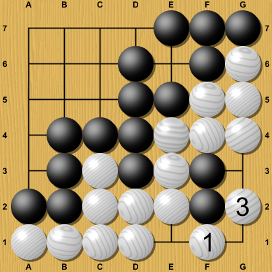
Only at the end, *after* all dame are filled, and White's entire group is in atari, does White finally make the protective moves inside.
But by being able to delay these moves until after all the dame are filled, White gains an extra move, effectively gaining 2 points. It is as if White did not have to pay for these final defensive moves, since White was able to delay winning the ko until after literally everything else was finished. The result is B+5.
Under Japanese rules however, none of this matters, White still had to make 2 protective moves, so the result is still B+6.
Normally, Chinese rules are either equal or favor Black by 1 point more than Japanese rules. But in this exceptional position, this normal order is inverted, and instead it favors White!
A Slide Refutes a Slide
Browsing around in the opening book, one can find some other fascinating discoveries that may have been overlooked by earlier work.
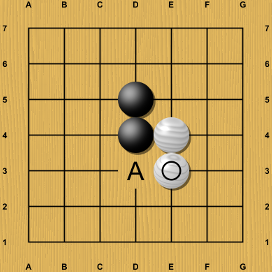
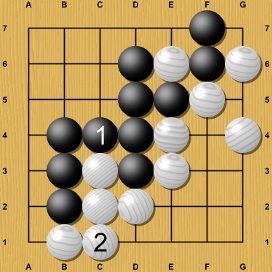
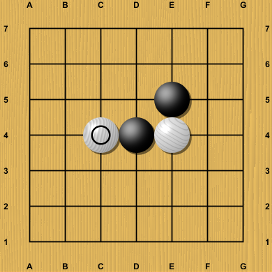
In this position, Black must play A.
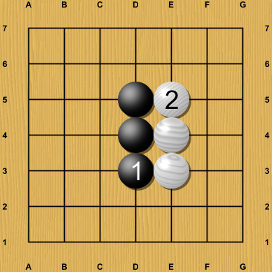
And then White 2 blocks and we get this normal sequence.
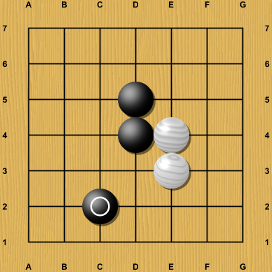
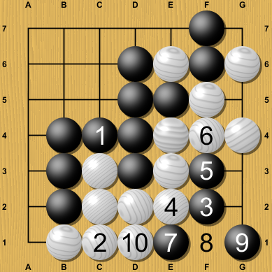
But what if Black plays here?
A natural guess is that White 2 should still block.
This simply transposes to one of the main optimal lines for both players. As we saw above this is the new opening line that leads to B+8 for Japanese, with A being a likely next move for Black.
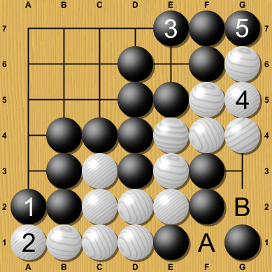
But White can do better. KataGo suggests that this counter-slide is the unique move for White to refute Black's slide!
The probable result from here seems to be B+7 instead of B+8. At fair komi, this is a 1-or-2-point winning advantage, depending on the rules. There are many things Black can try.

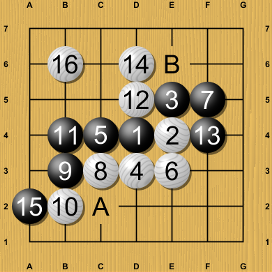
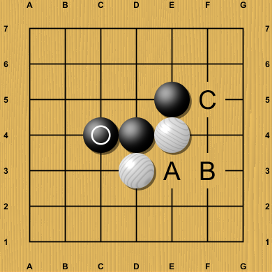
One of the critical lines seems to be this. We've almost transposed again, but with a key exchange A-B left unplayed. The lines are complex, but apparently this lack of exchange gives White an advantage in the upcoming fight. The hardest lines follow after Black C, the analogous move that Black would play in the normal line. If you are curious, try exploring the variations yourself!
New Seemingly-Optimal Opening Moves
Another interesting discovery by KataGo is of a few new opening moves.
In this early position, normally the moves one might consider are A, B, and C.
Move A is the variation discussed earlier, leading to the new optimal B+8 result for Japanese rules, and which is still equally optimal under Chinese rules too with B+9.
Past human solution attempts have focused heavily on analyzing B and C, which are also optimal under Chinese or other area-scoring rules. They likely lead to to B+9 under both Japanese and Chinese rules. But...
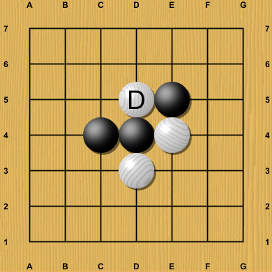
... KataGo's opening book suggests that move D may also be optimal under Chinese rules!
Under Chinese rules, the bizarre cut at D appears to result in B+9, which if correct, gives a fourth optimal move here. Under Japanese rules, the expected result appears to be B+9 as well, making move D equally good as B and C - moves that would be optimal, if not for the exceptional new variation for move A that leads to B+8, discussed above.
Fascinatingly, Li Zhe's article mentions the cut at D, but does not go into detail about it, offering it as an exercise to the reader. It would be interesting to know if there is a refutation that KataGo's books are currently missing! While we are optimistic that most of KataGo's book is game-theoretically optimal, along side lines like this, there of course always a somewhat greater chance of error.

KataGo also suggests that move E is optimal under Chinese rules too, which very few past solutions seem to mention or give a deep analysis to.
Possibly this move was not explored as deeply by human solvers due to its lukewarm, bad-shape flavor. This bad shape also reflects in its on-the-board results: under Japanese rules, KataGo's main line suggests it is strictly inferior to B, C, and D, giving B+10 instead of B+9. However, under Chinese rules, the analysis also suggests that White can barely recover this 1 point via another post-dame ko, in another surprising inversion of the normal advantage of Black on Chinese rules similar to the case discussed above. If true, and if KataGo isn't missing anything substantial, then this move might just barely join the other moves as being optimal under Chinese rules.
Going one step earlier, one finds another surprise: this clamping move is believed to be optimal under area scoring rules! We don't delve into variations here, but please feel free to explore the opening book if you are curious!
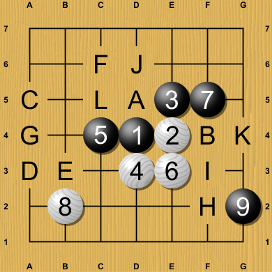
And going a bit deeper, one can find other fun positions, like this one. Under Chinese rules (but not Japanese rules), KataGo believes the play up to this point is optimal for both sides, and that from here, every one of the 12 possible followups A-L is equally optimal for White! Some of the resulting variations simply transpose to one another, or transpose except for an inconsequential exchange, but there are also many tactics and counter-responses that differentiate these moves as well. Of course, with so many variations, it is hard to be confident that this is truly correct, or if KataGo is missing something. There's a lot to analyze here!
Other Highlights
There are many other wonderful gems to find deep in the tree and in side variations of the book that involve refutations of mistakes by one side or the other. Many of these are cute tesujis or clever moves that appear to have been at times overlooked by earlier human solution attempts. It can also be instructive to interactively run KataGo in real-time beyond a leaf to see why a not-quite-finished endgame gets the score it does or how a particular move is followed up, once you go past the end of the book.
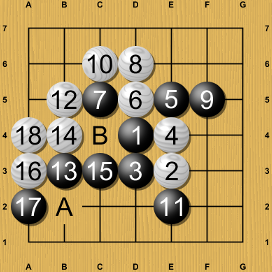
KataGo gives the slightly-odd-feeling diagonal shape of White 12 as the best move here. This was actually found by the earliest solution attempts reported by Davies from Japanese amateurs and professionals pre-1990, but forgotten again in some of the later 7x7 solution attempts!
Another gem is this position. While past solution attempts have Black play the obvious connect at A, KataGo thinks Black should be greedy and save one extra stone at B!
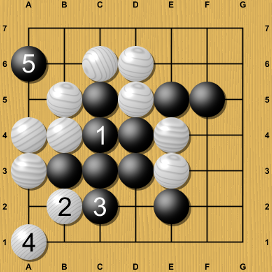
If white tries to capitalize on this, Black 5 gives white some major trouble. Black has no fear of the ko aji on the bottom.

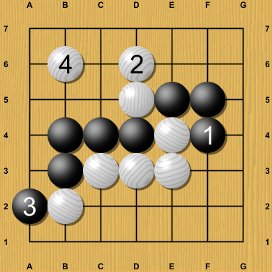
In this position from the American Go Journal sgf, KataGo recommends a cute placement for Black. In Japanese rules Black will gain an extra point, since even after White responds, Black can threaten seki in a way that White will need 2 defensive moves inside instead of only one 1 move. White should have connected solidly for move 16 instead to avoid this.
This was correct in the American Go Journal article itself, but appears to have been mis-recorded in their SGF. Other later work also handled this variation correctly, so this particular example is not a big deal, but still demonstrates how easy it is to overlook errors and how a subtle difference can affect the score by a point even this close to the end of the game.
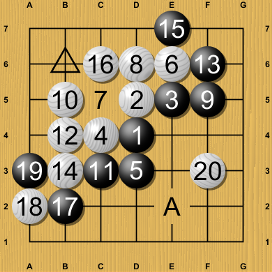
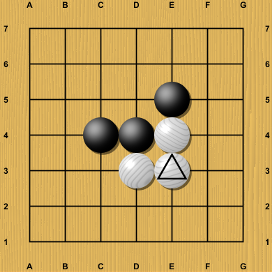
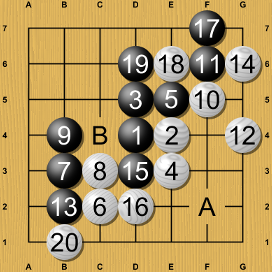
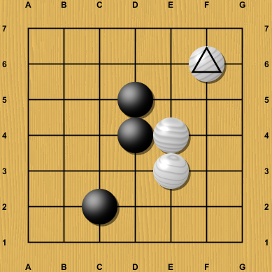
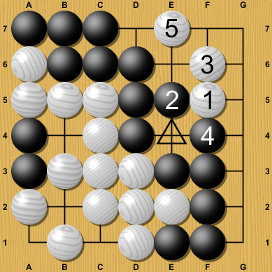
Another deep placement tesuji discovered by KataGo is this White 20 here. If Black 19 tries to throw in, eyeing the potential for a later move at the triangled point to create a seki in White's corner, White 20, if played at this precise moment, supposedly causes precisely the right trouble in Black's corner to counter Black 19. If Black tries too hard to profit, their entire lower right may become seki or run short of liberties while White threatens to live inside.
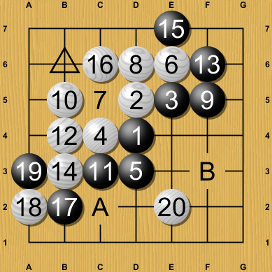
Depending rules and komi, this White 20 may be good enough too, and perhaps easier to understand despite being a less obvious shape. It directly aims for miai of A and B. Amusingly, with the current expansion level of the book, KataGo seems not entirely confident about some of the possible variations for this or the previous move. Deeper analysis focused here could almost certainly increase the confidence and accuracy if we spent a bit more compute, but at least it's clear that this is a very worthy move to consider.
In addition to deep placements, one can also find some simple but clever optimizations in the endgame. For example, as a minor improvement over an earlier human solution line, KataGo suggests that instead of capturing at B, Black must immediately push at A (or have already pushed earlier).
If Black waits too long to push, then later when Black finally does push, White does not block! Instead White falls back, which prevents Black playing the belly reduction at A.
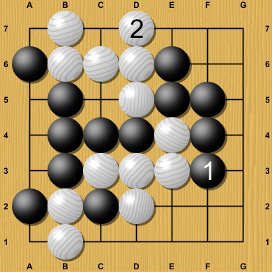
Another easy-to-overlook endgame optimization is this one, which was also found and analyzed in the blog post following Li Zhe's article. Under Japanese rules, KataGo suggests White must next hane at A before going back to prevent seki in the lower left corner at B. This will ultimately cause Black to owe one additional move inside, gaining White a point.
Because later if Black still refuses to add any moves, then ultimately White has this sequence to turn Black's area into a giant seki.

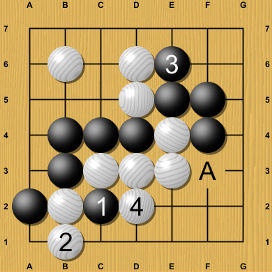
There are also positions where KataGo finds new unusual shape moves. In this line KataGo suggests this empty triangle for Black 13 instead of the block at A as was considered in earlier human solutions. This empty triangle, while at first glance seeming to be terrible shape, is key to enabling Black a cleaner squeeze in the upper left if white tries to cut at B5.
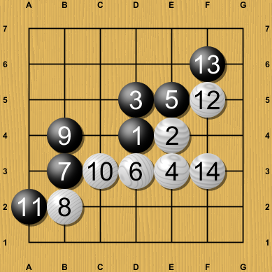
In this variation, we find another strange and fascinating empty triangle. KataGo believes White 14 somehow to be better for White than any other way of defending the stone at F5. This is another variation that may have been underexplored by earlier 7x7 solution attempts.
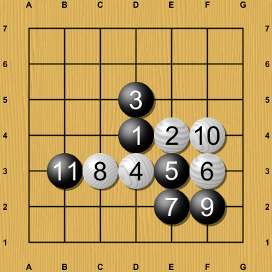
Tesuji and unusual shapes are not just limited to empty triangles of course! Here, although Black has other choices, KataGo suggests a sharp second-line nose play for Black to be the top preferred move. The tactics thereafter are very complex.
This is just a sampling of some of the lines - there are many more not discussed here. Please feel free to dig deeper into the books and take a look! And who knows - maybe you might find a counter refutation, something to improve even further, something that KataGo has missed. :)