KataGo Opening Books - 8x8 Highlights and Discoveries
Here we give an overview of the main seemingly-optimal variations for 8x8 and a sampling of some of the interesting moves. But really, check out the books yourself for a much more thorough enumeration of all the moves! See the top of the main page for links to the book and downloads.Contents
- Overview
- Main Center Opening (A)
- Knight Approach Opening (B)
- Far 3-3 Opening (C)
- One Point Jump Approach Opening (D)
- Area-Scoring-Only Openings (E,F)
Overview
The number of optimal lines on 8x8 is so much larger than 7x7 that it is hard to give an overall summary. Also, there seems to be much less prior work on solving 8x8 than 7x7, so although there are some explorations (such as 1 2 3 4), there is overall less to compare against. So here we mostly give just a high-level sampling of the main opening lines and point out just a few of the many, many interesting moves you can find.
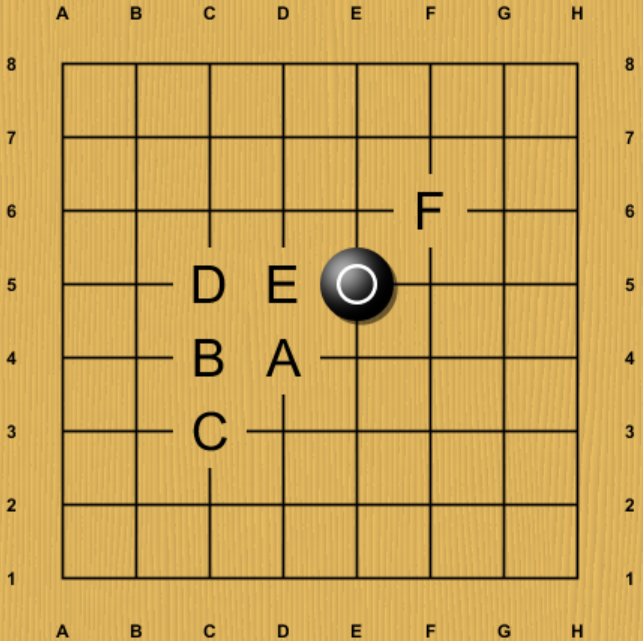
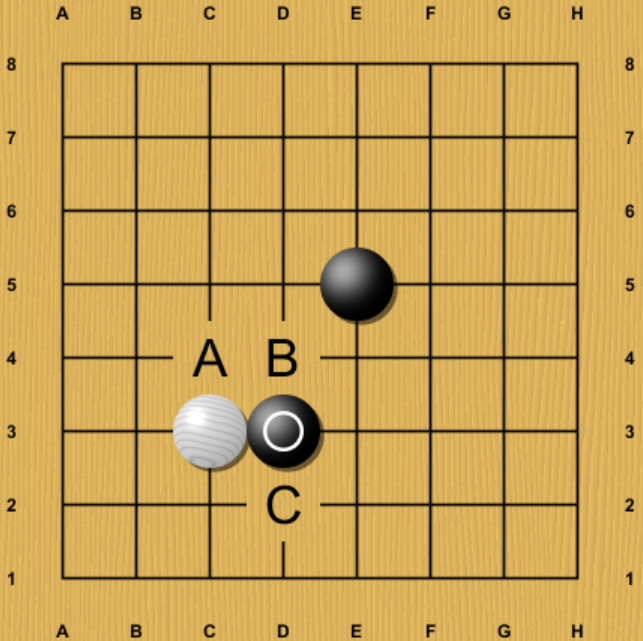
On 8x8, Black should open in the center, but unlike 7x7, as early as move 2 there already start to be choices! The center move of A is the obvious move and is definitely the "main" main line. However, all of B-D appear to be optimal as well, and under area scoring rules additionally E and F appear to be optimal. Most of the complexity of 8x8 arises from all of these other moves, as they lead to a wider variety of variations due to leaving the board a bit more open than the immediate contact move of A.
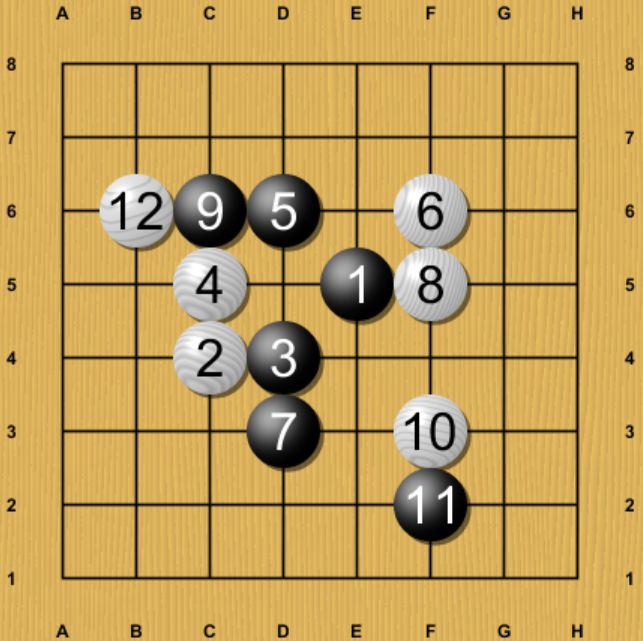
Main Center Opening (A)
The main center opening for White leads to an immediate pushing battle.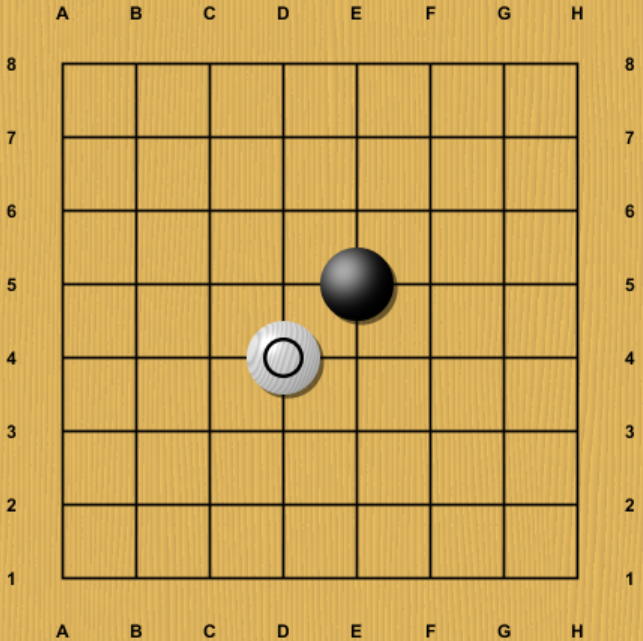
Due to rapidly settling the shape, this actually makes this one of the simpler optimal lines for 8x8 although this opening alone still quite possibly outcompetes all of 7x7 in complexity.
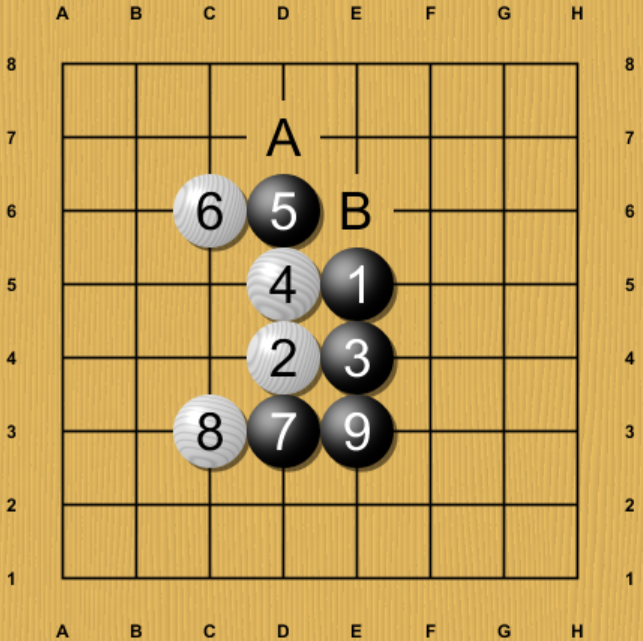
Although both players have minor deviations and alternatives, the most important line to which many alternatives transpose anyways is this one. White now has the choice between A and B. A is peaceful and leads to both players simply dividing the board vertically in half and the game ending almost immediately without any fighting if both players play accurately, so we'll focus only on B.
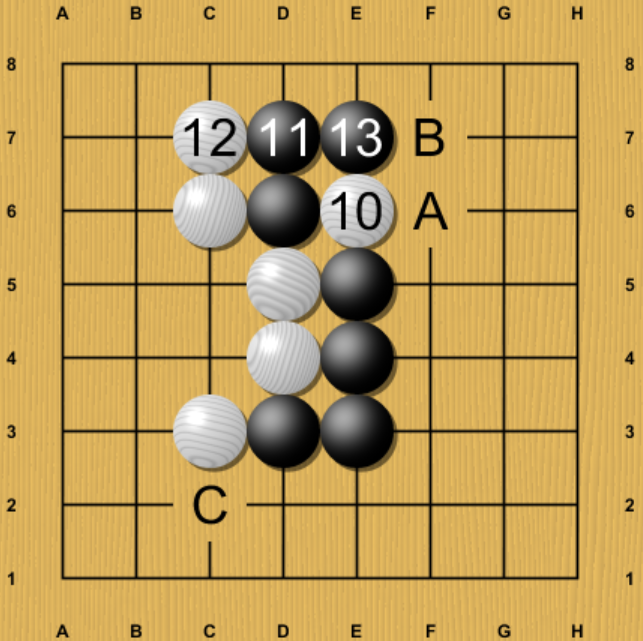
Going forward a few moves, we reach a crossroads. White must choose whether to exchange A for Black B before extending at C, or extend at C directly. While this may seem like a minor choice, they actually lead to completely different variations, as it is only at this moment that White can force this exchange.
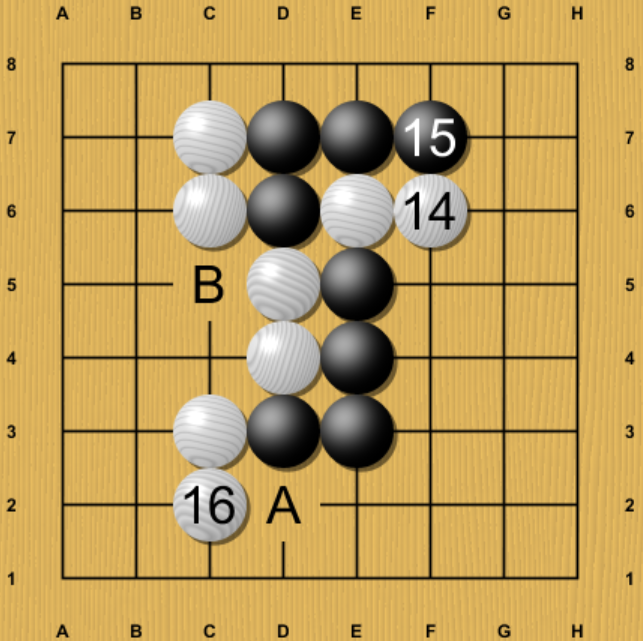
If White exchanges first, then Black apparently has two optimal choices, block at A before cutting at B, or cut at B directly.
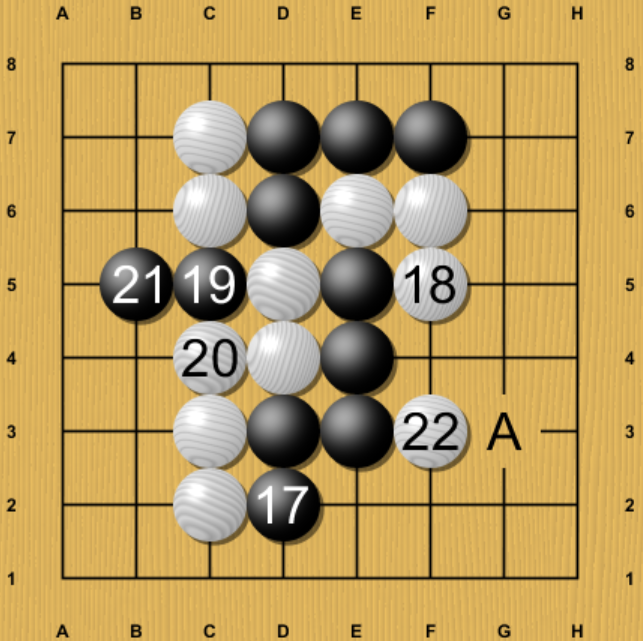
If Black blocks, then White 18, 20, and 22 are all forced. Some messy fighting follows, including some lines involving ko in the upper right, where White will try to sacrifice the stones on the right to squeeze Black and get good endgame while securing the left. White 22 at A, or any number of other deviations by either player not shown here also lead to some very interesting and highly nontrivial lines.
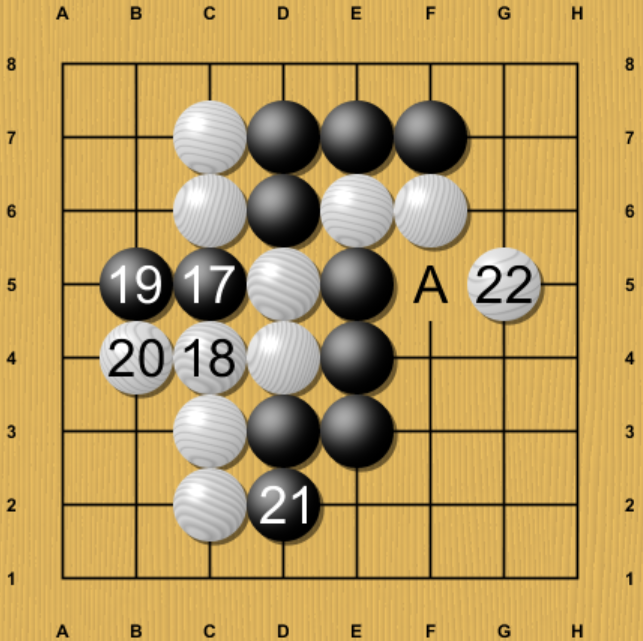
If Black cuts first, than many other possibilities can occur, and these have many subtle effects on the various moves thereafter. In this variation, Black gets to block at D2 anyways, but now White must play 22 as shown rather than at A. Interestingly, this variation is also evaluated very differently under Japanese rules than Chinese rules, by more than 1 point, due to White being able to win a post-dame ko that forms in the top side fight. As in 7x7, mostly, the lines optimal under area scoring rules are a superset of those possible under Japanese scoring, but this is one of the few lines where the opposite is true.
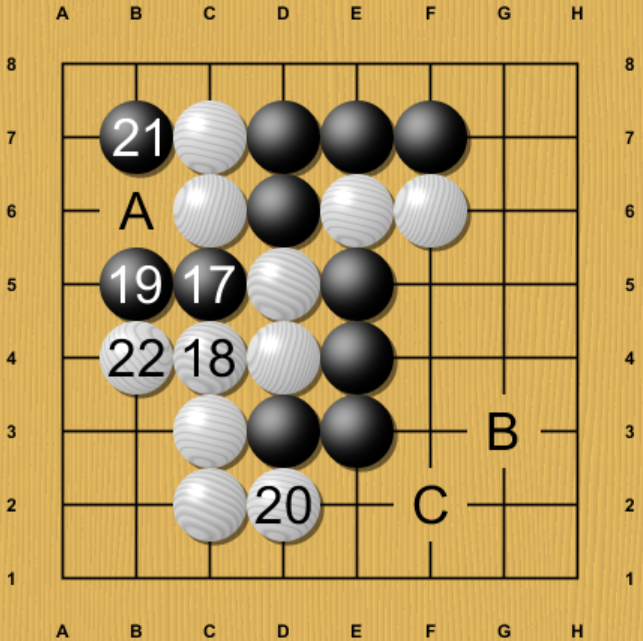
In another example possibility shown here that is equally optimal, White takes D2 while Black proceeds in the upper left. From here, Black might equally choose between any of A,B,C. In all of these variations, both players have to subtly adjust their move choices and move ordering depending on what has been exchanged.
In area-scoring rules, some more variations become possible. For example, in this position both A and B are also interesting alternatives for White that appear to be optimal under area scoring, but losing under Japanese scoring.
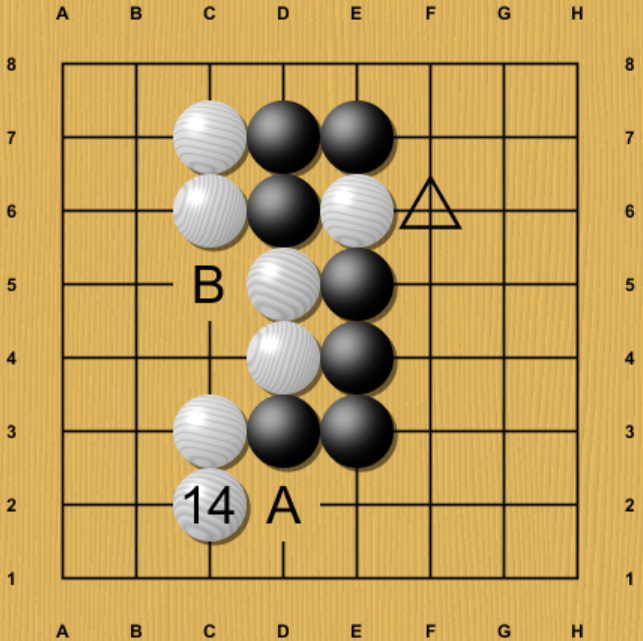
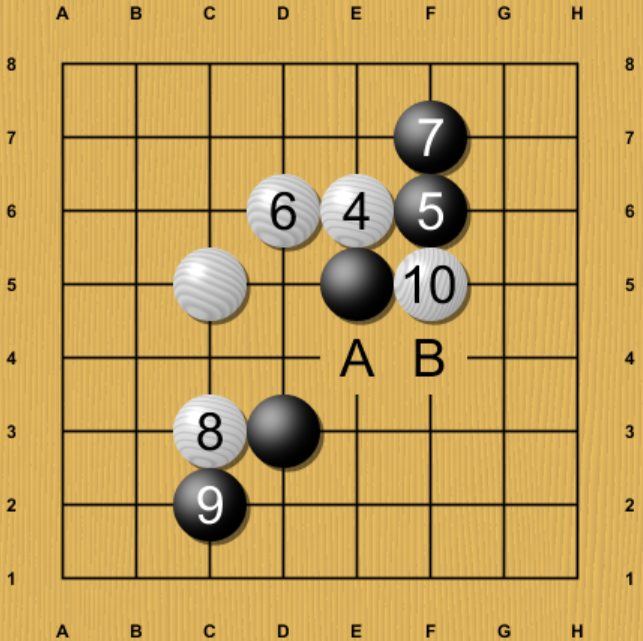
Going back earlier, we can also sample what happens if White doesn't exchange at the triangled point at F6, but rather descends right away. Here, in another subtle difference, now black cannot block at A, but can only cut at B.
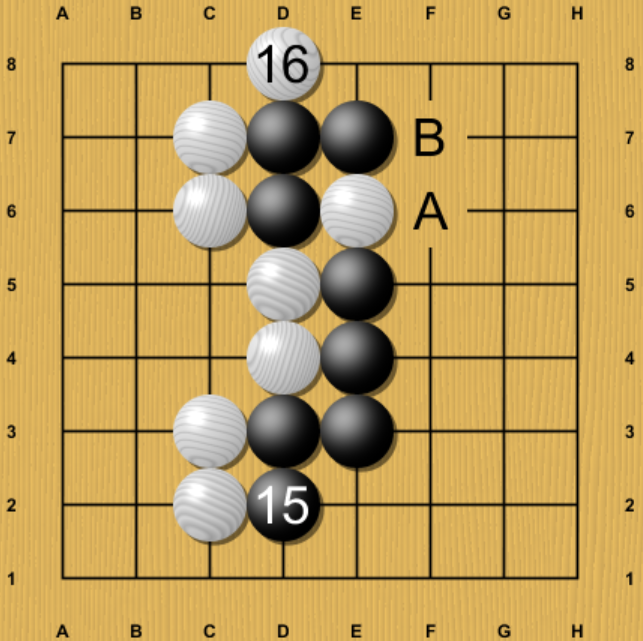
The reason is because if Black blocks, White responds with the hane here! Because White has not pulled out at A, now White's hane threatens to squeeze with the move at B. This is enough for White to win the endgame.
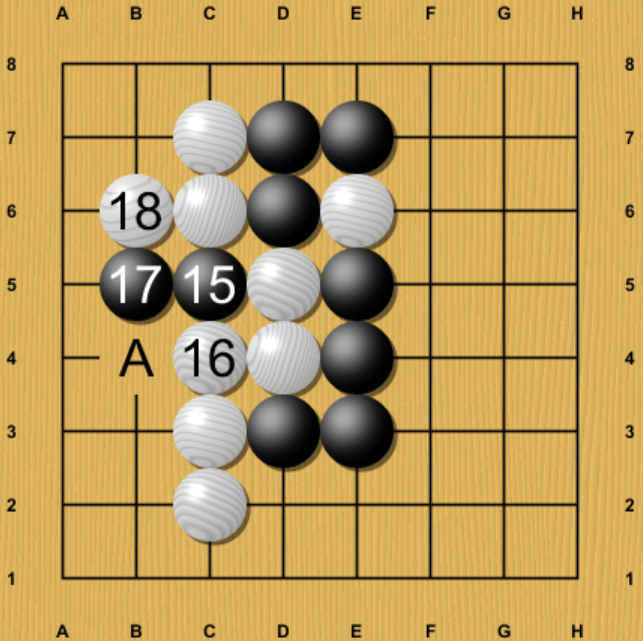
So Black instead cuts. Whereas in the lines where White exchanged at F6 earlier, White usually blocked at A, in another subtle difference, now for White 18 blocking at B6 is the only move, and blocking at A loses.

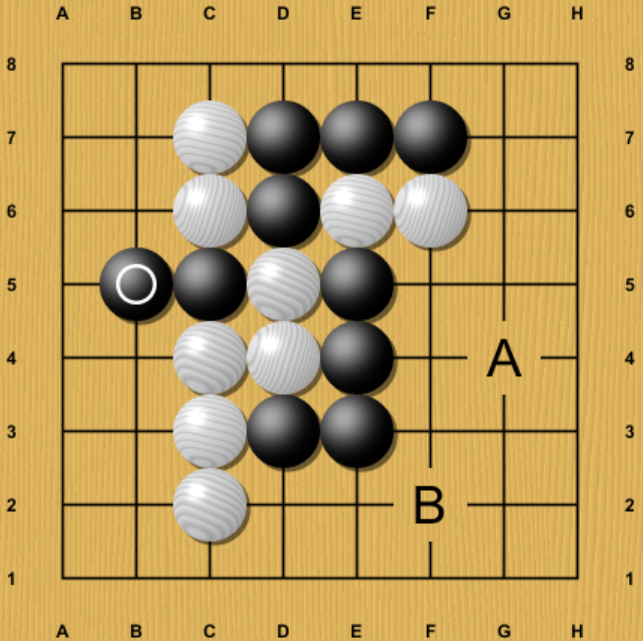
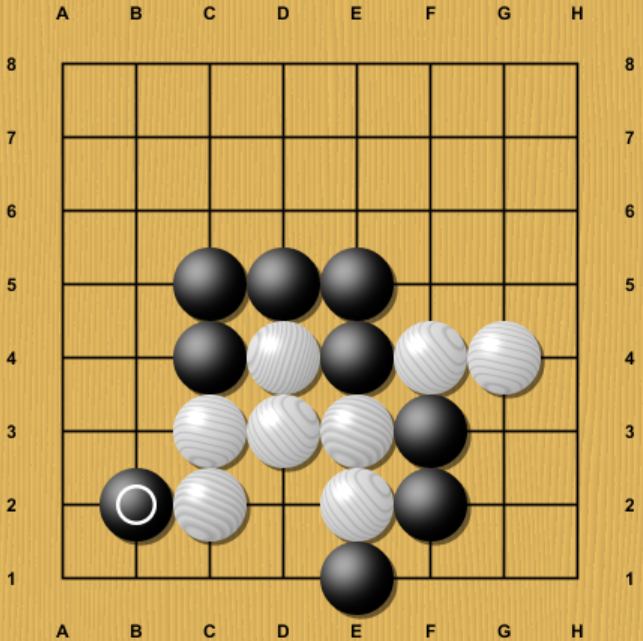
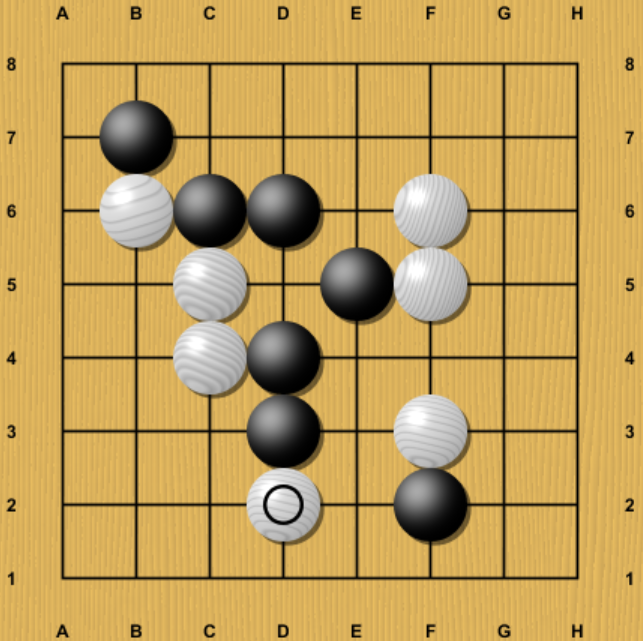
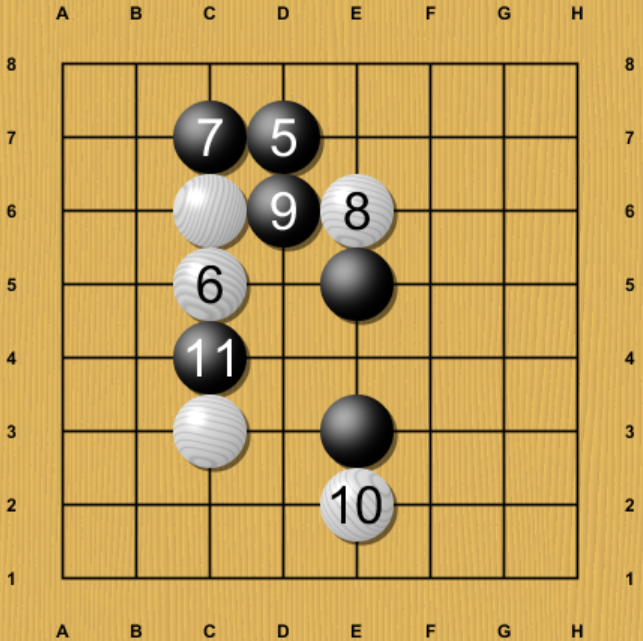
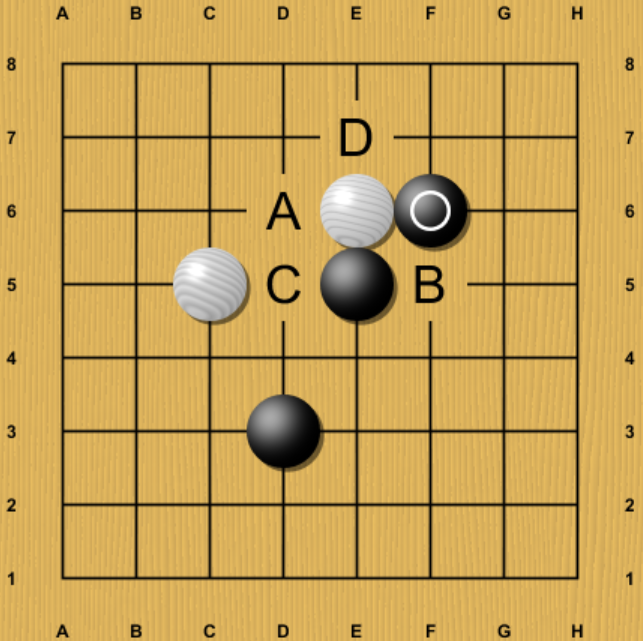
We shortly arrive here. Black must play one of A-D in order to have enough points, but the aji of White pulling out at the triangle is severe.
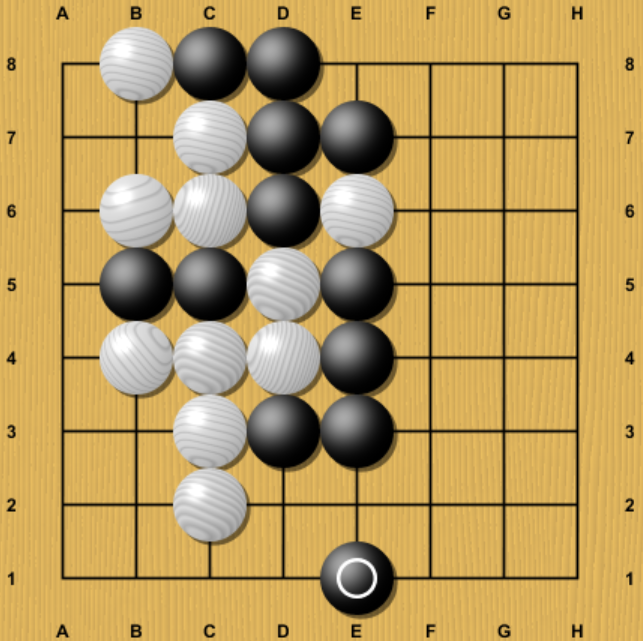
It turns out that, aside from wasting ko threats, jumping down here is the unique correct move for Black! This is the only move that both gains enough endgame and prevents White from causing trouble inside the right. The variations on the right are very complex and you might be interested to investigate them yourself to see how White refutes the other possible moves!
Note that there are some other lines we haven't covered, the above is just a sampling. For example, on move 6, on both Japanese and area-scoring rules, White can also hane here. This can easily transpose back, but also there appears to be an optimal branch that doesn't, instead leading to a very different fight.
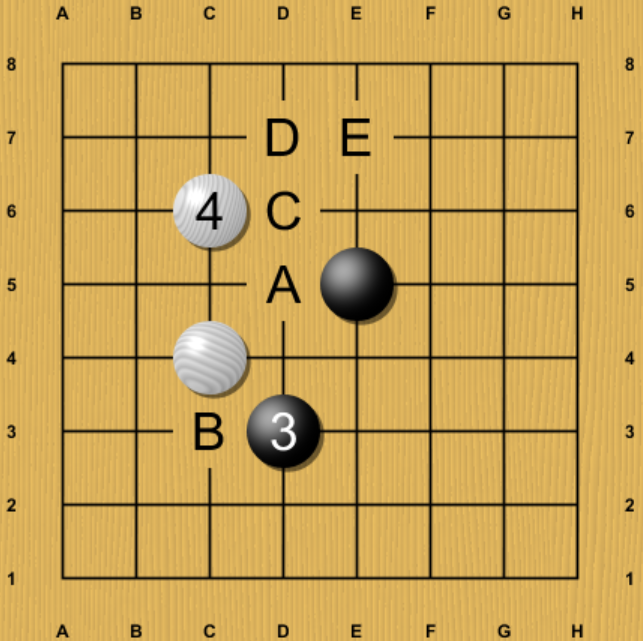
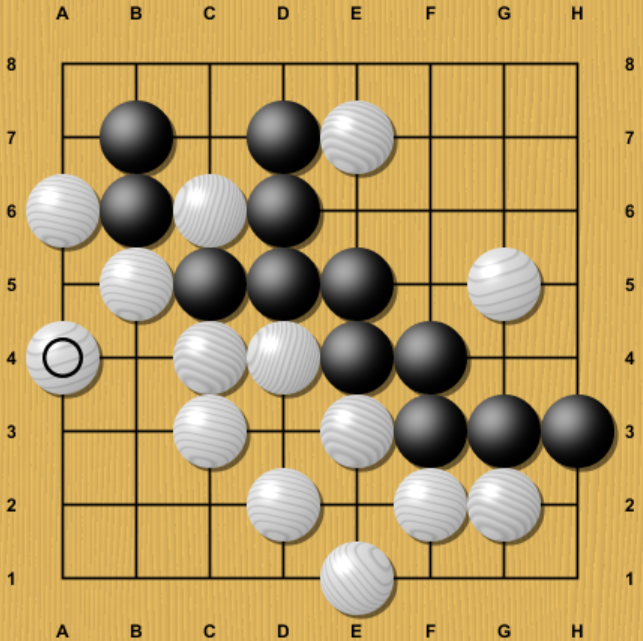
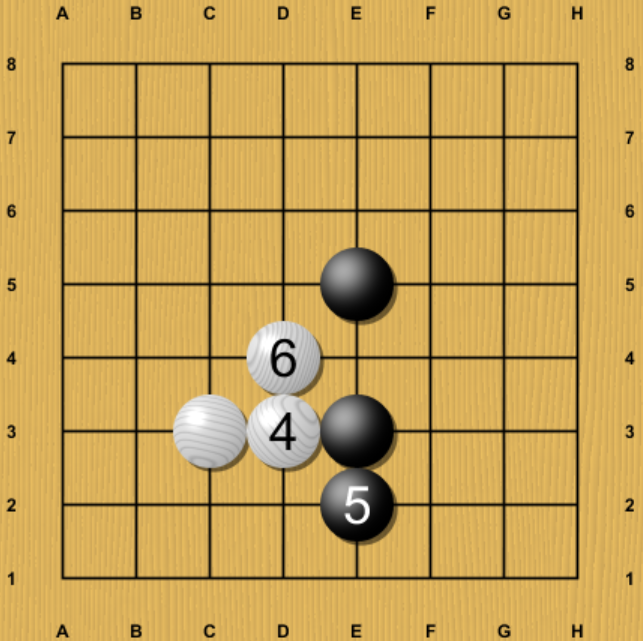
There are also several more tricky early opening deviations possible under area scoring. One particularly sharp line which is probably only optimal under area scoring arises from this somewhat strange choice for White 4.
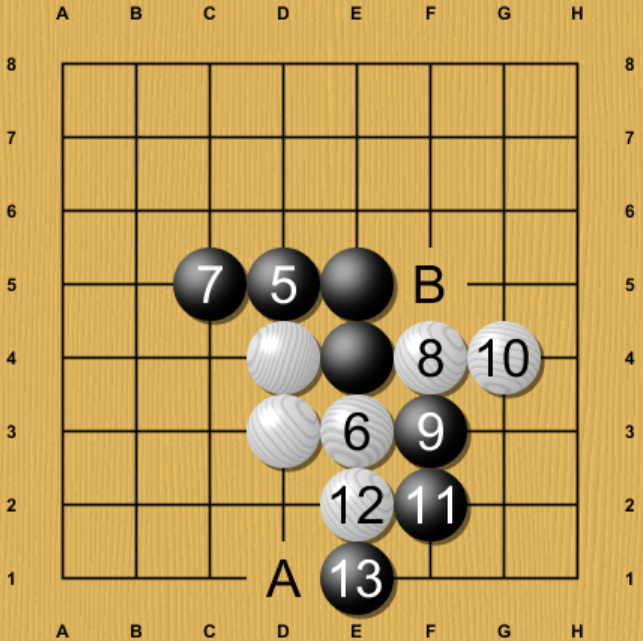
Up to White 12, a messy corner battle can start, with the hane of Black 13 being possibly a surprising key tesuji. If White merely blocks at A, Black now happily sacrifices and squeezes with B, with the 13-A exchange creating a key shortage of liberties on White's 4 stones that will come into play later in the lower left.
Going even further, we find this fun move. KataGo's evaluations here are definitely not certain - more compute would be needed to fully clarify this and similar lines in the book, as these lines are extremely sharp. Be wary also if exploring this variation interactively in real time - you can have hundreds of thousands or even millions of playouts and still not have the correct evaluation for some branches due to having deep blind spots from here as the fight spills into the top side as well.
Knight Approach Opening (B)
The knight approach opening seems to be White's top non-center opening. And although the center opening for White had many variations, this opening leads to even greater variety, and branches much faster right at the start. This is where the complexity of 8x8 becomes apparent.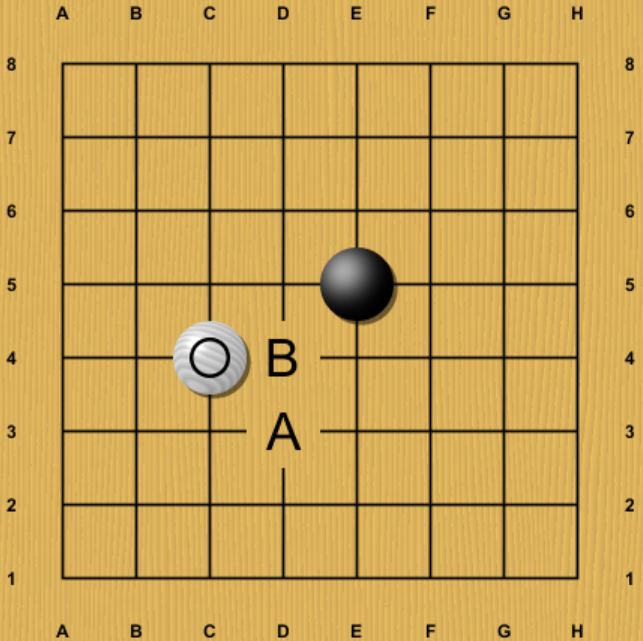
Here, Black has 2 only choices, although of course non-optimal deviations like E3 and C5 may not be easy to refute. However, even under Japanese rules where branching is more limited, after each of these choices White then has 2-3 distinct optimal choices (5 choices after each in Tromp-Taylor rules!), and after each of those choices, Black then has 2-5 optimal choices, and while some of them transpose or enter into fights where moves are more forced, many continue branching more from there. After just a few ply, we end up with about a dozen unique patterns all leading to mostly different midgame fights!
For example, here Black appears to have 5 different moves, all tenatively optimal according to the current book evaluation, whose followups mostly don't transpose to one another.
Among all these branches, this one is interesting because it is a move that at least according to current evaluations, seems to be only possible under Japanese rules and not area-scoring rules. Again, this appears to be due to post-dame ko, allowing White to gain extra points in area scoring and again breaking the normal rule that the optimal area scoring variations are a superset of the Japanese scoring variations. What is fascinating is that such a post-dame ko is seemingly able to affect a result all the way as early as move 5!
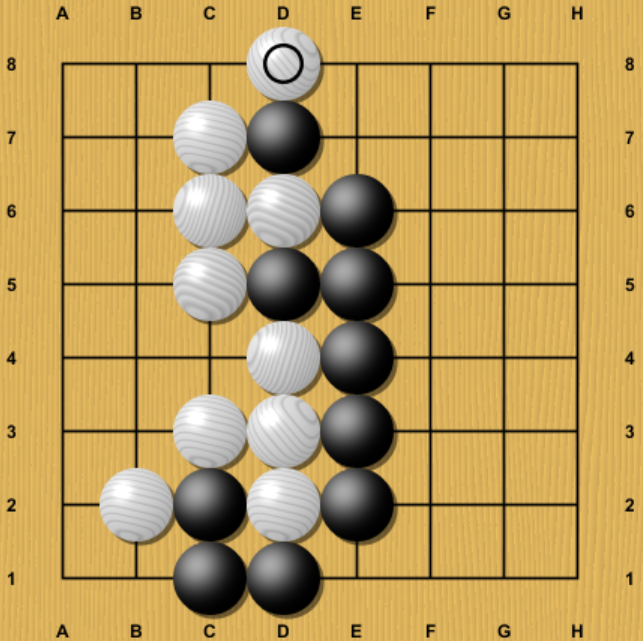
If you play the opening books for the two rulesets against each other, one as White, one as Black, it leads all the way to here, where now we see where White deliberately plays a hanging connection to make A5 into a future ko. White's two dead stones at E7 and G5 will be critical in providing threats. The ko fight itself is also remarkable - at one point for some subtle reasons, White must take some time off the ko to play a move that is dead-in-gote (yes, really dead in gote) and doing so is the only way to win!
On the Japanese side of the book for this line, among believed-optimal variations, we also find some really weird curiosities like this move.
But elsewhere in the knight approach opening, the area scoring book has its own curiosities claimed to be optimal, like this move!
Overall, a large number of variations from the knight approach opening lead to White trying to flexibly invade deeply on both sides with Black strung in various ways through the center... White looking for a good way to eventually sacrifice one side to squeeze Black for enough endgame profit, and Black aggressively attacking. Such as this variation.
Which, by the way, leads to this neat tesuji here.
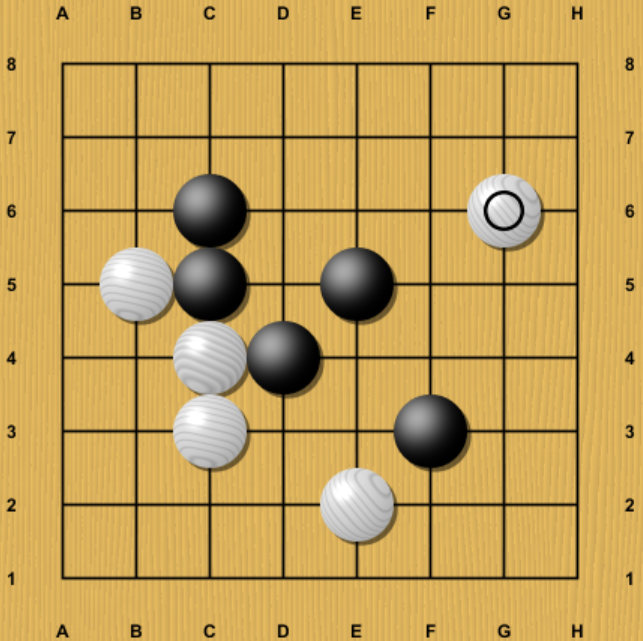
Here's another instance of White beginning a deep probe or invasion. This is not the only move, but it seems to be the only move in the upper right - it may require some deep reading to work out why this precise point is better than the other options for invading.
Far 3-3 Opening (C)
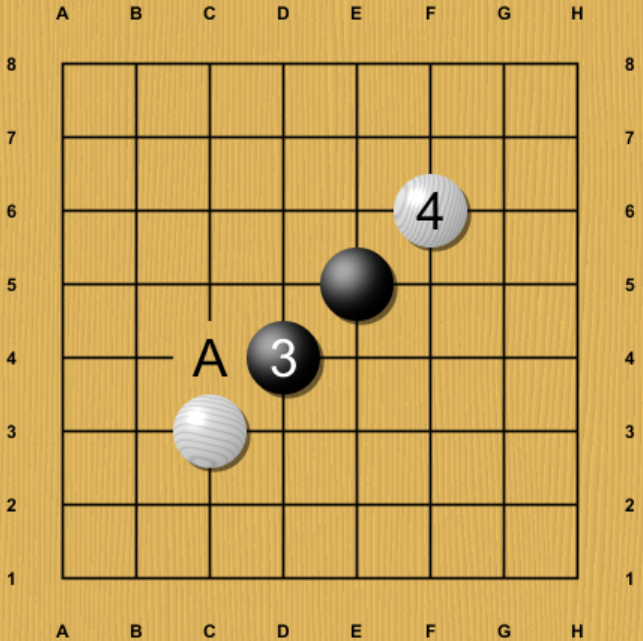
The far 3-3 opening also leads to a variety of variations, usually with White establishing a base on one side, and then sometimes probing or invading black's far side to create aji.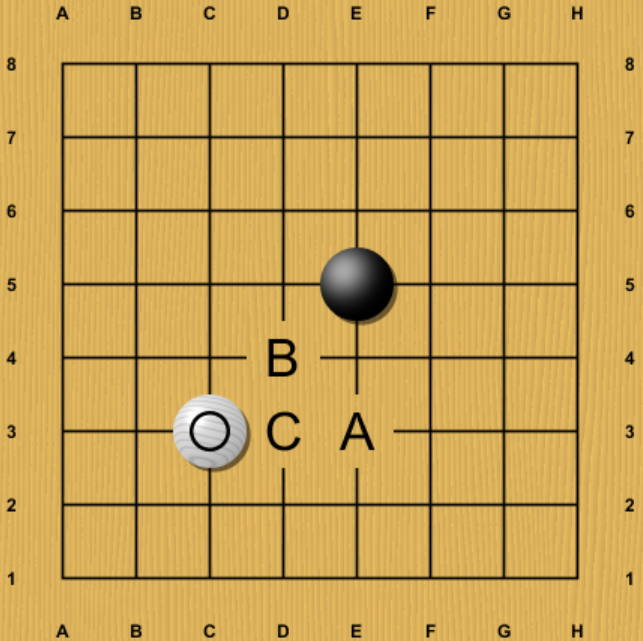
Black has 3 choices here, although B's principal variation transposes back to the knight approach opening (when White pushes at C4), and C's principal variation mostly transposes back to the center opening (when White hanes at D4). So the main new move is A.
Under Japanese rules, White's unique optimal response is to extend two points on the side, after which Black has 3 choices, each of which leads rapidly to its own branches.
One fun line is this one, where each side probes and counterprobes the other.
As before, under area scoring rules the number of seemingly optimal branches explodes further, and starts to include some amazingly strange lines. Perhaps the strangest one is this, where White plays an already unusual bump, followed up by a bizarre empty triangle.
The bump-and-empty triangle eventually leads here, where this first-line atari ends up being the key tesuji for White to eke out a draw in the endgame.
Another fun line to investigate under area scoring rules is this one. Whereas normally White would just play 4 at A, transposing to another opening, White might also consider this move, amusingly symmetrical.
In the attachment variation for Black 3 as well, not all of the variations transpose. If Black attaches, both A and B do transpose to lines from other openings, but under both Japanese and area-scoring rules C appears to be optimal as well, and can lead to its own entirely unique variations.
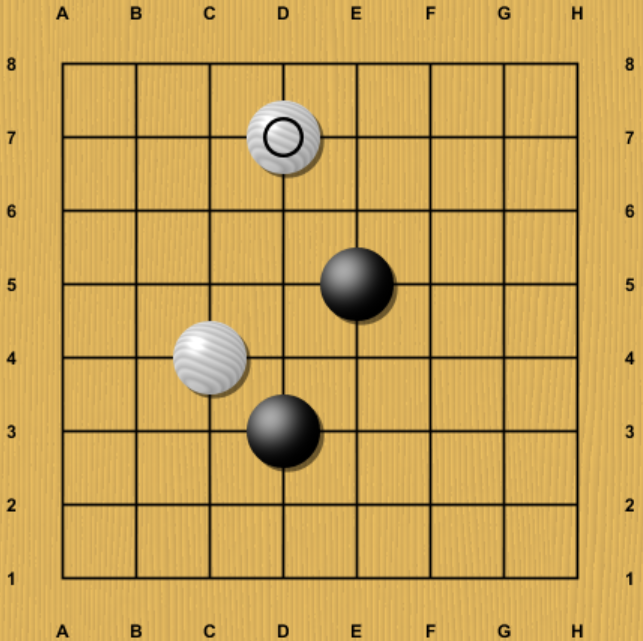
One Point Jump Approach Opening (D)
This is the fourth and final possible opening for White's move 2, at least under Japanese rules.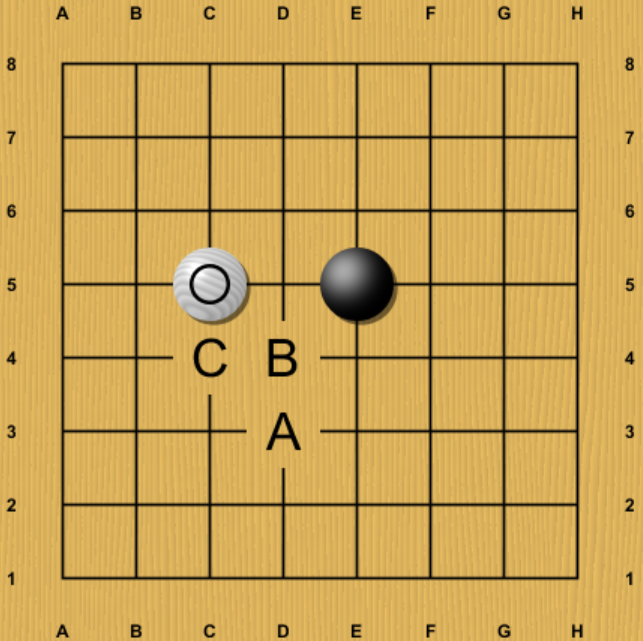
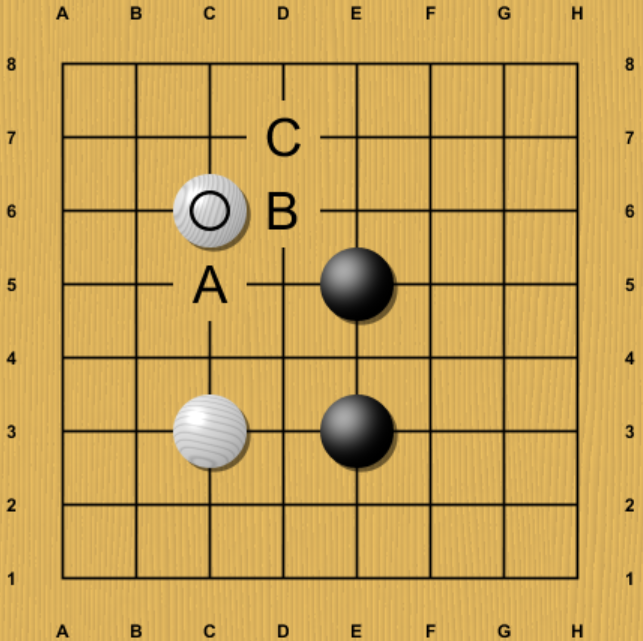
Having already analyzed all the other openings, at least under Japanese rules, this opening is relatively restricted. Black has 3 options, but B can only transpose to the knight approach opening (white blocks at C), and C can only transpose to the center opening (White plays hane inside at B, Black cuts, and White pushes at E4). So aside from attempting to refute all the unique non-optimal deviations for these moves (which of course is still highly nontrivial), the main new move is A.
And under Japanese rules, A appears to lead to a mostly one-way street up to about here, where Black 11 then has a choice between A and B.
Under area scoring, however, the number of optimal variations in this opening appears to be vastly larger. On move 6, White has 4 choices instead of just one, most of which don't transpose to one another later.
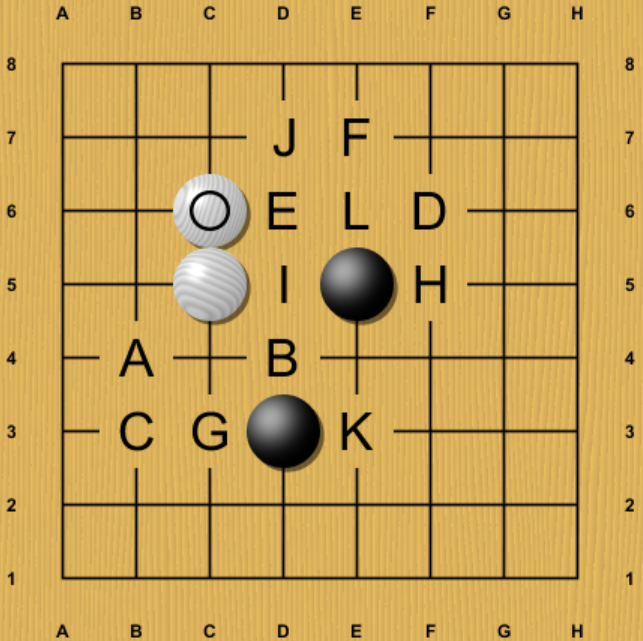
And one step earlier on move 4, White can play this bizarre slow stretch, after which *every* one of the responses from A-K many of which are equally bizarre, are currently evaluated to be equally optimal for Black! With so many branches, initated by such unusual shapes, it is quite possible that KataGo is misevaluating some of these moves, but at least for now, this is a fascinating opening to explore.
Area-Scoring-Only Openings (E,F)
Lastly, we very briefly summarize the two openings that, according to the current 8x8 books, are optimal only under area scoring.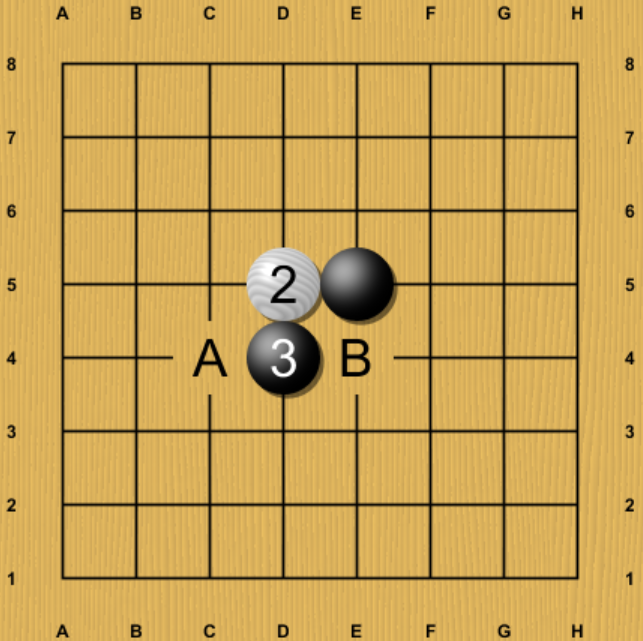
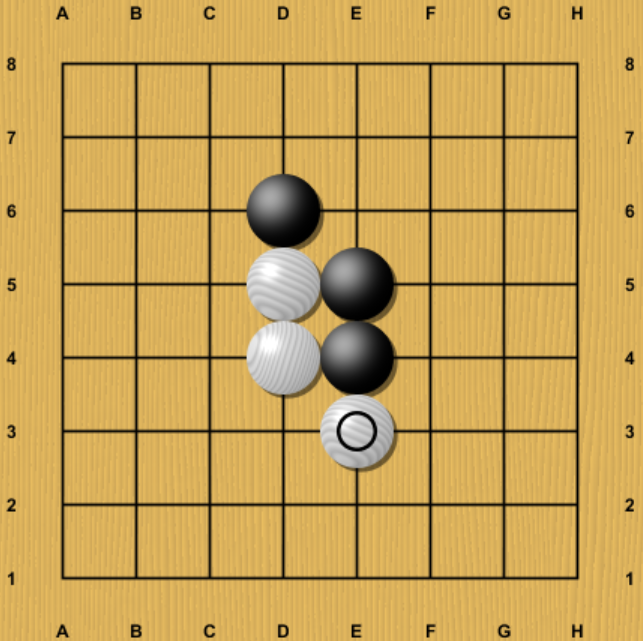
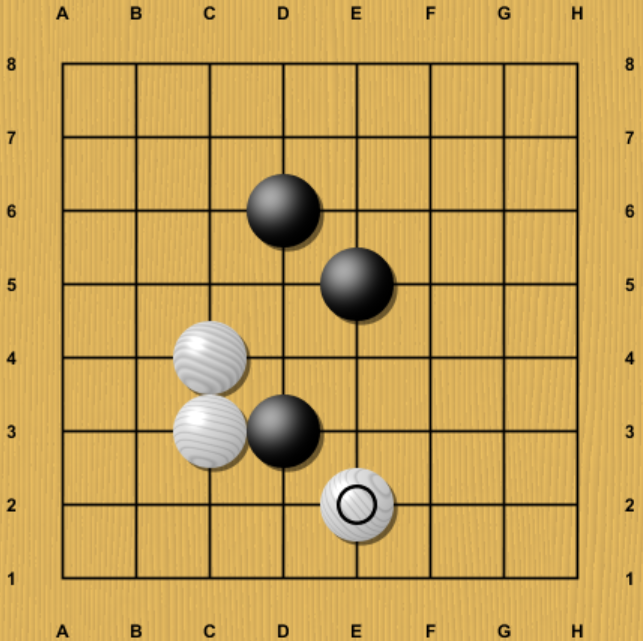
One of them is this attachment opening. Black plays hane in return, and then under Japanese rules both of White's counterhane and crosscut are judged as winning for Black, but under area scoring (or at least, Tromp-Taylor rules), both are judged as leading to draws for White. The resulting fights can be pretty sharp and interesting - feel free to take a look in the book!
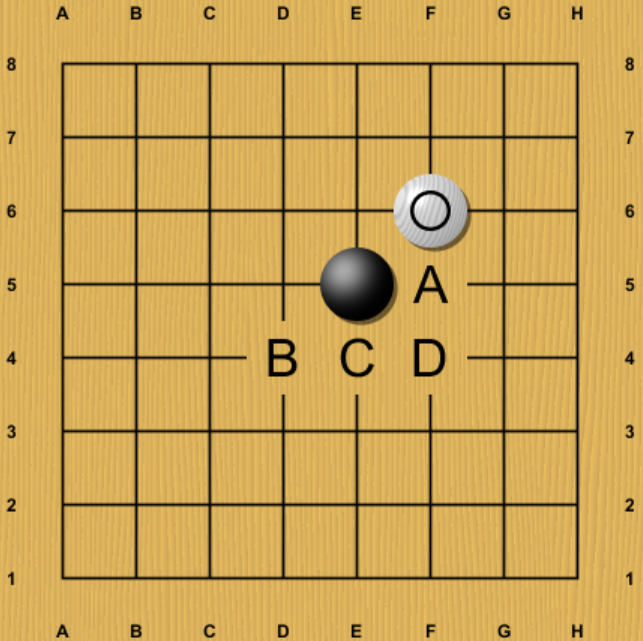
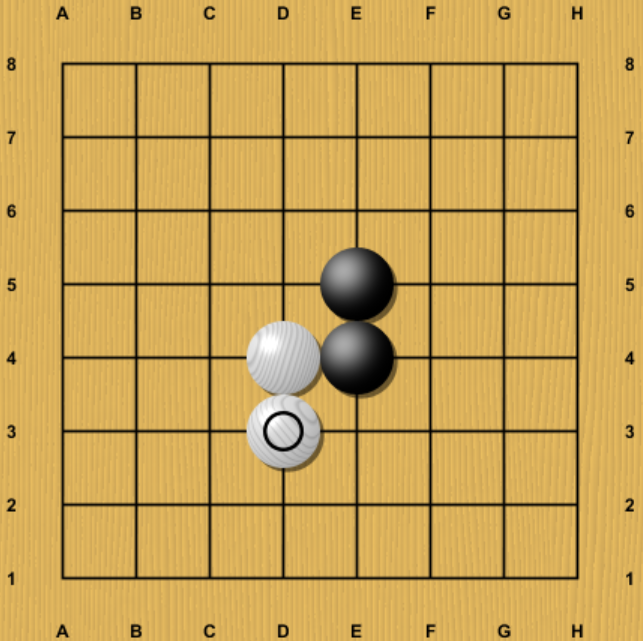
Lastly, we have the 3-3 invasion opening. If Black blocks at A, White's plan is to treat this as a forcing exchange and jump back to C4 or C5, leading to many unique opening lines. B simply transposes to one of the lines from the far 3-3 opening, except with the board rotated 180 degrees and so is also likely optimal. But current book evaluations suggest that Black can choose C or D too! These lead to their own unique families of variations.
Just as with 7x7, please feel free to dig deeper into the 8x8 books and take a look! We haven't even mentioned all the many many posible deviations from the optimal lines, some of which are amazingly deep and hard to refute, and some of which KataGo itself is still unsure about. As 8x8 is much larger and harder than 7x7, there are probably a few uncertainties and mistakes lingering in the book that may modify some of the above conclusions, and it is quite easy to find places where KataGo gives winrates that are close to none of 0%, 50%, or 100%, or where the estimated score is inconsistent with that of the winrate, so there is a lot to be discovered. If you find any particularly significant errors, let us know!